

Final Fantasy II dropped in 1988, and even by today’s standards, it remains one of the most ambitious RPGs ever made. Unlike its predecessor, FF2 threw out the traditional level-up system entirely and crafted a world that rewards exploration and experimentation. The map itself is a sprawling, interconnected mess of continents, dungeons, and secret locations that can trip up even veteran players. Whether you’re replaying the classic on emulator, tackling the PS1 remasters, or diving into the recently rereleased versions, understanding how to navigate Final Fantasy 2’s world can be the difference between smooth sailing and getting hopelessly lost in some random mountain range. This guide breaks down the Final Fantasy 2 map region by region, highlighting the towns you can’t miss, the dungeons that matter, and the less obvious routes that’ll save you hours of aimless wandering.
Key Takeaways
- The Final Fantasy 2 map requires old-school navigation without quest markers or minimaps, making landmark identification and strategic exploration essential for success.
- Major story progression flows through four central hub towns—Altair, Phin, Mysidia, and Paloom—each gating story progression and introducing critical NPCs and resources.
- Chocobos, boats, and teleportation spells provide fast-travel options that significantly reduce overworld traversal time once unlocked during gameplay.
- Early dungeons are straightforward navigation challenges, while mid-to-late game dungeons introduce locked doors, puzzles, and complex multi-level layouts requiring careful mapping.
- Hidden villages, optional dungeons, and secret areas reward thorough exploration with rare weapons, powerful spells, and valuable equipment unavailable through main story progression.
- Methodical region-by-region exploration prevents wasted backtracking, and consulting external maps or guides is a valid strategy that aligns with how 80s and 90s players originally navigated the game.
Understanding The World Of Final Fantasy 2
Game World Overview And Setting
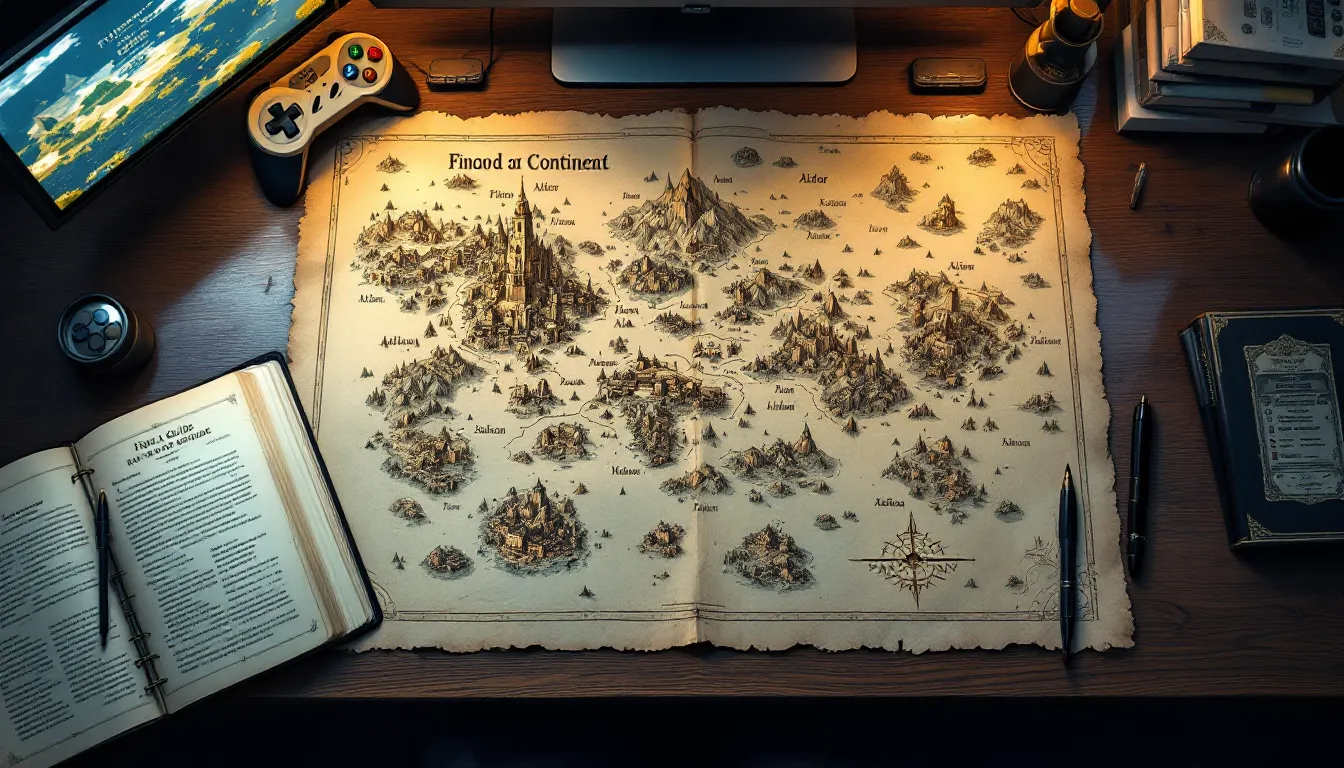
Final Fantasy II’s world is set on a continent plagued by the Dark Emperor’s tyranny. Unlike modern RPGs with quest markers and minimaps, FF2 relies entirely on old-school navigation, you’ve got a paper map in the manual, your own memory, and NPCs who drop vague hints. The world is divided into multiple zones and islands, each with distinct visual themes and enemy types.


The overall setting is darker and grittier than FF1. You’re not just collecting crystals for the sake of it: you’re directly opposing the Empire’s occupation forces. This narrative framing makes the geography feel purposeful. Towns don’t exist in a vacuum, they’re positioned strategically along the Empire’s borders or hidden in remote locations where the resistance can regroup.
How The Map System Works
FF2 uses a traditional overworld map where you walk around in real-time. Your party moves at a fixed pace, and there’s no sprint mechanic in the original versions (though later remasters added quality-of-life improvements). The map transitions seamlessly between the overworld and towns, no loading screens. If you’re standing outside a town’s border on the overworld, you can step into it directly.
The key thing to understand is that the map isn’t actually that large by modern standards. It just feels massive because navigation is slow and you don’t have a built-in map function. You’ll want to reference an external map or your game’s help menu (if available). Some versions include an in-game map system: earlier iterations don’t. The original game and most faithful remakes require you to either memorize routes or keep a map guide handy.
When you’re wandering the overworld, pay attention to landmarks. Rocky formations, bridges, and distinct terrain features act as visual signposts. The path from one location to another is always the same, so if you get turned around, backtrack to a familiar landmark and reorient yourself.
Major Regions And Continents
Finon Continent: Key Locations And Landmarks
The Finon Continent is where you’ll spend most of your early-to-mid game. It’s home to the starting area around Altair and extends southward through key story locations like Phin, Mysidia, and Paloom. The continent is relatively crowded with towns and serves as the main hub for Empire resistance activities.
Altair sits at the northwest edge and is your starting point. The town has basic shops and an inn, but don’t expect much loot or equipment upgrades beyond the starter gear. Moving south, you’ll hit Phin, a small town where you meet crucial NPCs who introduce the game’s themes of rebellion. Further down is Mysidia, home to the white mage’s guild. This is where the story picks up momentum, and you’ll start encountering tougher enemies on the surrounding map.
Paloom is the largest city on Finon and functions as a major resupply point. It’s packed with shops, magic vendors, and NPCs with useful dialogue. The Empire’s stronghold in this region creates story beats around Paloom, and it’s worth revisiting later in the game as new shops and options unlock. The continent’s eastern edge leads to ocean access, which is where you’ll eventually need to venture to reach other landmasses.
Kashuan And Northern Territories
Kashuan sits to the north and represents the harsh, mountainous wilderness. Getting there early is punishing, enemies are significantly tougher than what you’d face on Finon, and supplies are scarce. But, Kashuan contains one of the most critical story dungeons in FF2, so you’ll have no choice but to push through eventually.
The northern territories feel isolated and hostile. Towns are few and far between, with limited shops. The terrain is mostly mountains and snow, creating a sense of desolation that contrasts sharply with the busier southern regions. This isolation is intentional, it reinforces that you’re venturing into dangerous, edge-of-the-map territory.
One quirk of this region: certain routes only unlock after progressing the main story. You might find yourself blocked by story flags or NPC events, unable to proceed until specific plot conditions are met. The game doesn’t telegraph this clearly, so it’s easy to bang your head against an invisible wall. When you hit a dead end, try advancing the main storyline first.
Southern Islands And Coastal Areas
Southern locations include islands and coastal zones accessible via boat or chocobo. These areas tend to have moderate-to-tough encounters and host some critical story dungeons. Unlike Finon’s merchant-friendly towns, southern islands often feel sparse, more wilderness than civilization.
The coastal areas are visually distinct with blue terrain and ocean access. They serve as gatekeeping zones for mid-to-late game progression. You’ll need transportation to reach some islands, and having the right party members in your roster can open new routes. One island in particular, Mysidian, becomes accessible later and houses important NPCs and magic sources.
Resource availability drops on southern islands. Towns are smaller, shops have limited inventory, and healing items are pricier. This is intentional difficulty ramping, the game expects you to be self-sufficient and resourceful by the time you’re exploring this far.
Towns, Cities, And Important NPCs
Central Hub Towns And Story Progression
Altair, Phin, Mysidia, and Paloom form the narrative spine of FF2. Each town gates story progression and introduces plot-critical NPCs. Altair is your origin, it’s where the game starts and where you first meet your initial party members. The shop here is barebones, but the inn is functional for recovering between early battles.
Phin is the next major stop. It’s a small town that feels like a resistance hideout, and NPCs here discuss the Empire’s occupation and recruitment efforts. You’ll pick up your second party member(s) here, expanding combat options. The story establishes the stakes and tone in Phin.
Mysidia is where things get serious. It’s positioned as a magical sanctuary and home to important lore. The white mage’s guild here is a major story location, and you’ll gain access to magic spells from NPCs and guild facilities. This town is critical for understanding FF2’s magic progression system. You’ll want to come back repeatedly as you level up and unlock new spells.
Paloom, as mentioned, is the largest and most developed city. It has the best shops, the most NPCs, and the most vendor variety. Story events here are significant, and Paloom serves as a reset point when you need to restock heavily. The city feels like an actual hub rather than just a pit stop.
One important note: the Final Fantasy 2 Map: provides visual representation of town locations, making navigation easier if you’re using a digital reference.
Hidden Villages And Optional Locations
FF2 has several optional towns and villages that don’t appear in mandatory story progression. These locations often contain useful NPCs, rare magic, or valuable equipment. Finding them requires either stumbling across them organically or consulting a guide.
One notable hidden village sits off the beaten path and houses a mage who teaches powerful spells. Another contains an NPC who sells rare weapons unavailable elsewhere. These villages exist as rewards for thorough exploration, they’re never explicitly pointed out, and you’ll miss them if you stick to the critical path.
Hidden locations are usually accessible from early in the game, but the enemies are often overleveled for when you’d naturally arrive. This creates an interesting dynamic: you can stumble into a secret area, realize you’re outmatched, retreat, and return later once you’re stronger. The game doesn’t punish this, it’s part of the intended exploration loop.
Some hidden areas require specific items or party members to access. Without the right tools or NPCs, certain locations remain closed. This encourages experimentation and multiple playthroughs to discover everything.
Dungeons, Caves, And Combat Areas
Early Game Dungeons And How To Navigate Them
FF2’s early dungeons are relatively straightforward but can still be maze-like if you don’t pay attention. The Gatrea dungeon, one of the first major dungeons, is a good introduction to FF2’s dungeon design. It’s not overly large, but it has multiple floors and enemies that match early-game difficulty.
The key to navigating early dungeons is patience. Take mental notes of room layouts, mark dead ends, and methodically explore each floor. The game won’t hand you a map, so you’re relying on your spatial memory or keeping notes. Mapping out dungeons on paper or digitally isn’t cheating, it’s what players did in the 80s and 90s.
Early dungeons typically have a straightforward path to the boss, though some include optional branches with treasure chests or secret passages. The boss encounters at the end are designed to be challenging but beatable with adequate preparation. Make sure your party is healed before entering the boss chamber.
One practical tip: if you find yourself completely turned around in a dungeon, backtrack to the entrance and approach from a different angle. Sometimes you’ll spot a previously overlooked passageway or realize you missed a corridor.
Mid To Late Game Dungeons And Boss Locations
Mid-to-late game dungeons are significantly more complex. The Castle of Kashuan, for instance, is a sprawling multi-level dungeon with numerous interconnected rooms, winding corridors, and secret passages. Boss encounters here are meaningfully harder and require specific strategies or party compositions.
Boss locations in major dungeons are always at the end of clear progression paths. You won’t accidentally stumble into them, you’ll know when you’re approaching a boss chamber because the dungeon architecture tends to funnel you forward. The game has subtle environmental design cues that signal boss proximity.
Mid-to-late dungeons introduce mechanics like locked doors (requiring keys), pressure plates, and other light puzzle elements. These aren’t Brain-age tier, they’re simple, but they add pacing and prevent the dungeons from feeling like linear hallways. The puzzles serve to gently break up combat encounters.
Equipment and preparation matter here. Bosses in mid-to-late dungeons have specific resistances and attack patterns. Before entering, review your party’s equipment, ensure you have relevant magic spells, and stock up on healing items. One mistake in a late-game boss fight can cascade into a total party wipe.
Optional High-Level Dungeons And Secret Areas
FF2 hides several optional dungeons that don’t gate story progression but contain rare equipment, powerful spells, or substantial experience. These dungeons are genuinely dangerous, their enemies are among the toughest in the game, and even well-prepared parties can struggle.
One famous optional dungeon sits on a remote island and is almost entirely skippable unless you’re hunting for specific gear. The payoff is worth it if you know what you’re looking for, but stumbling in blind will get you killed quickly. These dungeons exist for completionists and min-maxers who want to squeeze every advantage from the world.
Secret areas within dungeons, like hidden boss chambers or treasure vaults, are even more dangerous. They’re tucked away in rooms you’d never discover without a guide or blind luck. The enemies here represent some of the highest-level encounters in the game.
Gaining access to optional high-level dungeons sometimes requires specific items, spells, or party members. You might need a teleportation spell to enter, or a specific NPC companion to unlock a previously sealed door. This encourages return visits and rewards experimenting with different party configurations.
Travel Methods And Navigation Tips
Walking, Running, And Overworld Movement
Your default movement on the overworld is walking, a steady, slow pace that lets you take in the scenery but makes long-distance travel feel sluggish. The original FF2 doesn’t have a sprint mechanic, though some remasters and ports added run functionality via holding a button. Check your specific version’s control scheme: if running is available, it’s a significant time-saver.
When walking, pay attention to terrain. Grass is fast to traverse, mountains slow you down, and water forces you to find bridges or alternate routes. This natural terrain gating prevents you from cutting across the map in a straight line, the world’s geography forces you to take logical paths.
The walking speed is actually a feature, not a bug. It gives you time to appreciate the world design and notice visual landmarks. A bustling town, a distinctive mountain formation, or a forest of dead trees becomes a mental anchor that helps with navigation.
One overlooked aspect: your party’s movement interacts with enemy encounters. Certain terrain types spawn specific enemy types. Forests have different encounters than plains, and mountains have their own creature pools. This means traversing different routes gives you different combat scenarios, which is useful if you’re hunting specific enemies or want to avoid tough battles.
Fast Travel Options And Shortcuts
Chocobos are your primary fast-travel option once you obtain one. These yellow birds move significantly faster than walking and open up new route possibilities. Chocobo forests, marked by clusters of trees, let you call chocobos to traverse quickly. Using a chocobo in a chocobo forest is the closest FF2 gets to mounted travel.
Boats provide ocean access and are essential for reaching islands and distant coastal areas. Once you have boat access, entire new regions open up. Boat travel feels slower than chocobo travel, but it’s the only way to cross deep water and reach isolated locations.
Magic shortcuts exist too. Teleportation spells let you warp between known locations, bypassing long overworld treks entirely. These spells are typically learned later in the game and require specific spell knowledge. Characters who’ve leveled up magic sufficiently can cast teleportation, which instantly moves your party to a memorized location.
One often-missed shortcut: certain passages through dungeons or mountain areas create shortcuts on the overworld map. Exiting a cave from a specific side might place you much closer to your destination than walking around the long way. Experimenting with dungeon exits pays off. Sites like Game8 have detailed walkthroughs that highlight these useful shortcuts if you’re stuck.
Resource Locations And Item Farming Spots
Where To Find Rare Equipment And Weapons
Rare weapons in FF2 don’t drop from random encounters, they’re either bought from specific vendors or found in treasure chests within dungeons and hidden areas. The best weapons are often locked behind story progression gates or hidden in optional dungeons.
Paloom’s shops have the highest-quality equipment available for purchase. Once you reach Paloom and unlock its vendors, you’ll have access to significantly better weapons and armor than what’s available in earlier towns. But, even Paloom’s shops don’t stock the absolute rarest weapons. Those come from dungeon exploration and secret locations.
Certain chests are only accessible with specific items or magic spells. A treasure chest behind a sealed door requires a key found elsewhere, while one surrounded by fire needs a fire-resistance spell or specific equipment. This design encourages experimentation and rewards thorough exploration.
One hidden weapon stash sits in a remote corner of an optional dungeon. It’s easy to miss if you’re not methodically checking every room and dead-end corridor. The payoff is substantial, getting these weapons early significantly boosts your combat capability.
Healing Items And Crafting Material Locations
Healing items are abundant, especially in populated towns. Inns are your primary healing source, they fully restore HP and MP when you stay overnight, which costs gold. Potions and other consumable healing items are sold in every town’s shop and become more effective as you progress.
Crafting materials for spells aren’t typically the focus in FF2 like they are in modern RPGs, but certain items boost spell effectiveness or modify spell properties. These materials are found in treasure chests and sometimes sold by specialized vendors.
High-level healing items are sold in Paloom and other late-game towns, but they’re expensive. It’s often more economical to visit an inn than to stock up on potions and heal items for individual battles. The game’s economy encourages inn usage for major recovery and saving consumables for emergencies.
One frequently overlooked resource: NPC-dropped items. Defeating certain enemies, particularly bosses and unique encounters, can yield equipment or potions you won’t find elsewhere. These drops are always guaranteed for specific encounters, making certain boss fights worthwhile for the loot alone.
The Final Fantasy World: Discover guide provides context on how FF2’s economy and resources fit into the broader Final Fantasy experience, which can inform your approach to farming and spending.
Exploration Strategies And Achievement Hunting
Mapping Out An Efficient Exploration Route
The most efficient exploration strategy for FF2 is methodical progress by region. Start with Finon, thoroughly explore it, then move to adjacent regions. This prevents you from wasting time backtracking constantly and lets you level appropriately for each area’s difficulty.
Create waypoints in your mind or on paper: key towns, major dungeons, and landmark locations. Once you have these anchored, filling in the gaps becomes much easier. You’ll know that town X is north of landmark Y and west of town Z, letting you navigate logically.
Timing matters. Explore optional areas once you’re strong enough to handle their enemies without constant healing. There’s no shame in turning back from a dungeon if you’re getting demolished, grind levels elsewhere and return when you’re ready. The game respects this playstyle.
Prioritize story dungeons first, they’ll gate story progression and give you natural breakpoints for exploration. Secondary optional dungeons can be tackled in any order once you’re over-leveled enough. This creates a natural pacing where you’re always making forward narrative progress while having optional content available if you want side quests.
One practical approach: create a digital map or consult an existing one. Knowing where you are relative to known locations eliminates wandering. This isn’t cheating, it’s using the tools available to you to optimize play time.
Secrets, Easter Eggs, And Completionist Checklist
FF2 has several secrets that reward exploration and experimentation. Hidden NPCs, optional boss encounters, and secret items exist for players who hunt thoroughly. Some secrets are hidden in plain sight, dialogue hints that point you toward hidden areas if you read carefully.
One secret dungeon is accessed via a specific area that seems unremarkable unless you try interacting with it in unusual ways. The game rewards curiosity and experimentation, even if it seems strange to try something in the moment.
Completionist checklists should include all towns visited, all dungeons completed, all optional bosses defeated, and all spells learned. FF2 doesn’t have an in-game achievement system, but the sense of completion from discovering everything is satisfying in its own right.
Rare weapons and ultimate spells are the cherry on top for completionists. Finding these often requires knowing exact locations or executing specific strategies. If you’re hunting for everything, a detailed walkthrough is invaluable.
Secrets extend to NPC interactions too. Talking to NPCs multiple times sometimes reveals new dialogue or triggers events. Some NPCs have preferences, and interacting with them at the right story moment unlocks new dialogue or quests. The game rewards attentiveness.
According to coverage on Siliconera, fan communities have documented nearly every secret and easter egg in FF2 over the decades. If you’re hunting the obscure stuff, community wikis and forums are goldmines of information.
Common Navigation Mistakes And How To Avoid Them
The biggest navigation mistake is aimless wandering. Without a map or reference, it’s easy to feel lost and waste time backtracking. Solution: keep a map open or create rough notes of key locations as you discover them.
Getting stuck on story gates is common. You’ll find a location you can’t enter because a story event hasn’t triggered yet, or an NPC won’t let you pass because your party isn’t composed correctly. When you hit an invisible wall, don’t assume the game is broken, advance the story elsewhere. Come back once you’ve progressed further.
Underestimating dungeon difficulty leads to wasteful grinding. Instead of immediately grinding when a dungeon feels hard, try different party compositions or equipment setups. Sometimes switching strategies is better than brute-forcing through levels. If that fails, then grind.
Missing hidden areas happens to everyone. It’s easy to assume you’ve explored thoroughly when you’ve only hit major locations. This is where subsequent playthroughs shine, you’ll naturally discover things you missed previously. Don’t stress about finding everything on your first run.
Not talking to NPCs thoroughly wastes hints. NPCs drop navigation clues, story progression requirements, and hints about secret areas. If you’re stuck, re-talking to NPCs you’ve already met sometimes reveals new dialogue that points you in the right direction.
One specific trap: assuming all paths are valid. Some passages look like open routes but lead to dead ends or extremely dangerous encounters. If a path feels suspiciously hard, try exploring alternative routes first. The game doesn’t hide optimal paths, but it doesn’t highlight them either.
Not using available resources is another mistake. If you have a chocobo, use it to traverse open areas faster. If you have teleportation spells, use them to bypass long walks. These conveniences exist to improve quality of life, using them isn’t “easy mode,” it’s just playing efficiently.
Consult IGN’s gaming guides for comprehensive walkthroughs if you’re genuinely stuck. There’s no shame in consulting a guide, the game is old, and its design assumptions don’t always align with modern player expectations. Using external resources is a valid and encouraged approach.
Conclusion: Mastering The Final Fantasy 2 World
Mastering the Final Fantasy 2 map is fundamentally about embracing the game’s philosophy of exploration and discovery. Unlike modern RPGs that hold your hand with quest markers and minimaps, FF2 trusts you to navigate, remember, and experiment. That trust is part of the game’s charm, when you finally reach an obscure location after wandering for twenty minutes, the satisfaction is tangible in a way that following a GPS marker never is.
The key takeaway is this: the world is interconnected and logical, even when it doesn’t feel that way immediately. Landmarks and terrain features serve as navigation aids. Towns follow a natural progression from story beats. Dungeons gate content intelligently, forcing you to come back once you’re stronger. None of this is accidental, it’s deliberate world design that rewards attention and exploration.
Whether you’re playing the original 1988 release, the PS1 remasters, or the modern ports, the fundamental map structure remains unchanged. The advice here applies across all versions. Some remakes add quality-of-life features like in-game maps or fast-travel options, but the underlying geography is identical.
Your approach to the world should be iterative. You won’t find everything on your first playthrough, and that’s okay. Return later, explore deeper, and uncover secrets you missed. The game is designed for multiple playthroughs and encourages experimenting with different party compositions and exploration approaches. Each run reveals something new.
The Final Fantasy Timeline: Unraveling provides historical context on how FF2’s world design influenced subsequent Final Fantasy titles, which can deepen your appreciation for what the developers were attempting. And the Cecil Final Fantasy: The Epic Journey from Darkness to Redemption guide shows how later games iterated on FF2’s narrative approach, connecting the dots across the franchise.
Eventually, mastering the Final Fantasy 2 map means developing spatial memory, trusting your instincts, and embracing the slower pace of 8-bit exploration. Take your time. Pay attention. Talk to NPCs. Try weird things. The world rewards curiosity, and that’s what makes it worth exploring.


